Welcome to the Ultra Athlete family! Let’s get started on helping you get the most out of your new ankle brace.
Thank you for shopping with Ultra Ankle – we appreciate your business and are here to help you get acclimated with your new ankle brace.
Step 1: Break-In Period
With all of our braces it’s important to keep in mind that (like new shoes) there will be an initial break-in period of:
- ~ 3-5 hours for athletes or those participating in vigorous activity
- ~ 4-8 hours for individuals wearing the brace for walking or other activities
During this initial break-in period, you will also need to:
- Loosen your laces a little more than usual while your ankle gets acclimated to the new brace
- Wear a long, tall sock that covers all areas under the brace. If you experience any discomfort with rubbing, it may be helpful to wear two socks at first.
Step 2: Follow Product Specific Fitting Instructions
Navigate to your ankle brace model for specific notes and fitting instructions.
Ultra Zoom | Ultra High-5 | Ultra CTS | Replacement Parts
Step 3: Review Cleaning & Care Instructions
To make sure you get the most use out of your new ankle brace, follow these important cleaning and care tips.
- Cleaning – Carefully remove the inner pad (attached via Velcro®) and hand wash with a damp cloth and mild detergent. Air dry prior to use. Do not machine wash or dry.
- Hinge Lubrication for Squeaking – Because of the thermoplastic resin used in Ultra Zoom and Ultra CTS braces, the hinges may dry out and begin to squeak. If your brace develops a squeak in the hinge area, spray silicone lubricant (such as WD-40 Silicone Spray) in the rivet and hinge area, then wipe clean with a dry cloth.
Step 4: Give us your Feedback!
We love to see our customers in action wearing their ankle braces! Here are some of the ways you can share the Ultra Ankle love:
- Post a photo of you in your brace on social media – don’t forget to tag us @ultraankle and we might even send you a surprise 🙂
- Write a review on Amazon or our website
- Tell your friends and family about your new ankle brace
- Stop by our booth at volleyball tournaments and events to tell us how you like your new brace
- Email us your ankle injury and bracing stories – even better if they include photos! – to [email protected]
How to Wear the Ultra Zoom
- Step 1: Watch the fitting video below for how to put on your new brace
- Step 2: Wear the brace so it starts forming to your ankle. The first time you wear the Ultra Zoom it may feel stiff and somewhat uncomfortable because its new has yet to form to your ankle.
Important Notes about your Ultra Zoom
- If you have pain initially, loosen the upper strap to lessen the pressure. Wear two pairs of athletic socks to provide extra cushioning until the brace forms to the ankle. Be patient through this break-in process.
- If you have any issues with the way the brace FITS in the shoe or FEELS on your ankle, our athletic trainers will help your work through any fitting issues – just send us a message.
- Ultra Zoom braces are not ankle specific. Since the Ultra Zoom will use your body heat to create a snug, form-fit to your ankle they will become ankle-specific after the break-in period is over.
- Because of this, make sure to mark your brace LEFT or RIGHT on the inner white tab on the top strap to identify which ankle it goes on.
- Accidents happen. If you only wear one brace now and end up hurting your other ankle, do not put your used Ultra Zoom brace on your other foot. Doing so will be uncomfortable and cause your ankle brace to start losing its shape.
- If you’ve ordered a Small/Medium brace and the lower inversion strap fits but the top strap is too short, purchase an extra long strap for added comfort. You do not need to size up to a larger brace. X-Long straps are available for purchase via our website only.
- More information on cleaning and care instructions are available – including what to do if the hinge on your brace ever starts to squeak.
Questions? Send us a message – we’re here to help.
Back to Top
HOW TO WEAR THE ULTRA HIGH-5
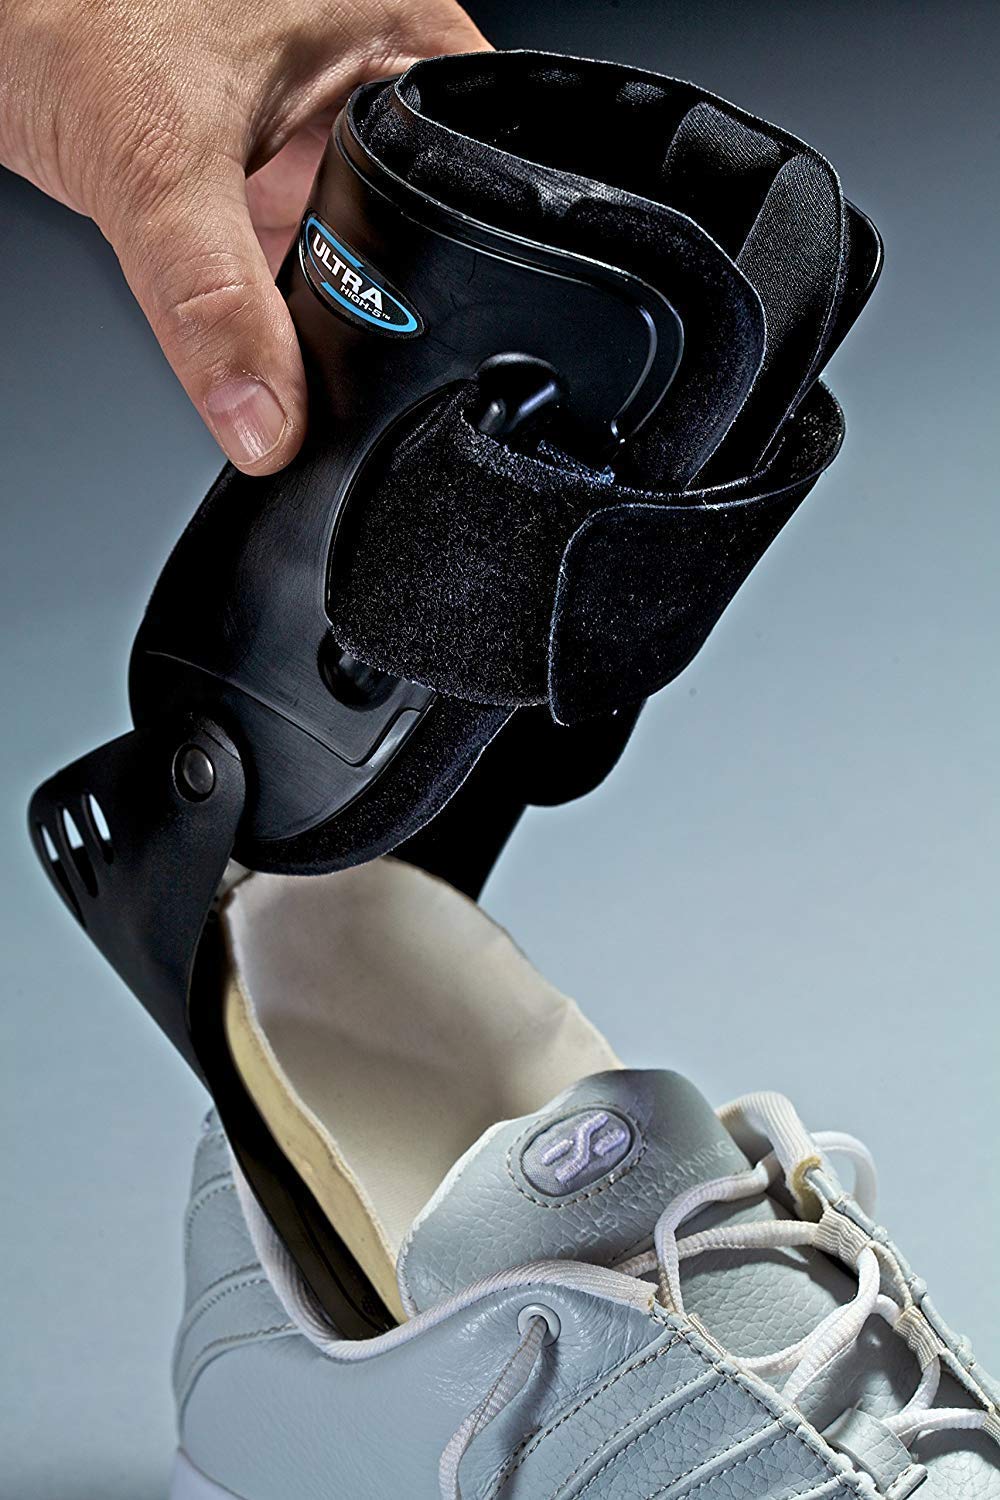
- Step 1: If possible, place the bottom of the Ultra High-5 beneath the insole of your shoe. Secure the top strap then tie your shoe laces.
- Step 2: Wear the brace so it starts forming to your ankle. The first time you wear the Ultra High-5 it may feel stiff and somewhat uncomfortable because its new has yet to form to your ankle.
Important Notes about your Ultra High-5
- If you have pain initially, loosen the upper strap to lessen the pressure. Wear two pairs of athletic socks to provide extra cushioning until the brace forms to the ankle. Be patient through this break-in process.
- If you have any issues with the way the brace FITS in the shoe or FEELS on your ankle, our athletic trainers will help your work through any fitting issues – just send us a message.
Questions? Send us a message – we’re here to help.
Back to Top
How to Wear the Ultra CTS
- Step 1: Watch the fitting video below for how to put on your new brace
- Step 2: Wear the brace so it starts forming to your ankle. The first time you wear the Ultra CTS it may feel stiff and somewhat uncomfortable because its new has yet to form to your ankle.
Important Notes about your Ultra CTS
- If you have pain over the injury site, loosen the upper straps to lessen the pressure over the painful area. Once the injury starts to heal and the brace forms to the shape of your ankle then you can tighten the straps for more security as your activity level increases. Be patient through this break-in process.
- When putting on your Ultra CTS brace, secure the middle strap first followed by the lower inversion strap that goes over the foot, then lastly secure the top strap.
- When you secure the straps over the top of your foot, make sure they do not overlap on top of each other and that they are fully secured to the pad that goes over the top of the foot.
- If you have any issues with the way the brace FITS in the shoe or FEELS on your ankle, our athletic trainers will help your work through any fitting issues – just send us a message.
- If you’ve ordered a Small/Medium brace and the lower inversion strap fits but the top strap is too short, purchase an extra long strap for added comfort. You do not need to size up to a larger brace. X-Long straps are available for purchase via our website only.
Questions? Send us a message – we’re here to help.
Back to Top
Replacement straps or pads
All braces use the Upper Activity Strap, but only the Ultra Zoom and Ultra CTS use the lower inversion strap. Here are some helpful tips for replacing your straps and pads.
- When you’re replacing the straps on your brace, do so one strap at a time so you can see how they were originally inserted.
- When replacing the pad, make sure to align the velcro on the new pad with the existing velcro on the shell.
Back to Top
Fitting Questions and Concerns
If you’ve followed the steps for getting a proper fit or if you’ve tried to break-in your brace but still are experiencing discomfort, please contact our customer support team. We can help you make adjustments to your brace and make sure it is comfortable to wear.

